
Back in 2009, I was given the great opportunity to travel all over China for a month. It was in many ways a childhood dream fulfilled, as I was a bit of a sinophile especially when it came to Chinese food. I remember the sense of joy before my trip as I went around telling my friends and family how excited I was.
That was until I told my older brother. “Well hold on” he said, “I’ve been to China many times before, and the food is completely different from the Chinese food we get here in America”. “No way”, I remember telling him, “stop being such a lying a**hole”. And while my brother can still be an a**hole from time to time, I have to admit, he wasn’t lying that day.
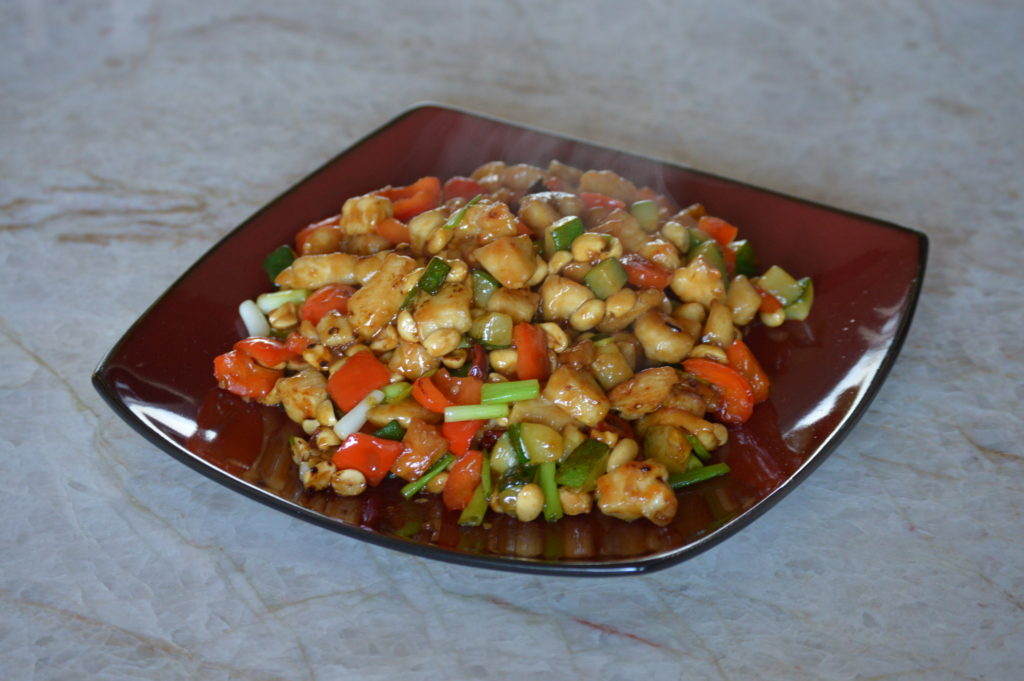
You see after that month in China, I learned that for the most part, authentic Chinese food has little resemblance to Chinese American food. I mean there is a whole list of unrecognizable dishes, all with a completely different set of tastes and textures. It was truly an eye-opening experience, however, I was lucky enough to find one of the few exceptions to this rule, kung pao chicken.
The main difference that I found between the two versions, is that in China they use a liberal amount of Sichuan peppercorns, while in America we tend to add veggies such as zucchini and bell pepper. Other than that the dish is practically identical in both countries. So with that being said, I thought why not try to create our own take on the dish by including the best parts of both. We’ll have the mouth-numbing sensation that comes from the Sichuan peppercorns, along with having a dish that is more rounded with the addition of vegetables. No one says we can’t have it both ways, right?
Tips, Tricks & Suggestions
- Traditionally The sauce for kung pao chicken would include an ingredient called Shaoxing wine. However, unless you live by an Asian food market, this ingredient is next to impossible to find. Luckily you can substitute the ingredient with either dry sherry, or dry white wine. Trust me when I say that unless you have lived in Sichuan province your entire life, you will probably never know the difference.
- The second key ingredient for creating the authentic kung pao chicken taste is the Sichuan peppercorn. Just like Shaoxing wine, it is a little hard to find, however, I have noticed that it is becoming a little more prevalent in some grocery stores. Unfortunately, there is no real substitute for this ingredient, which begs the question, will it make or break the recipe? Well, personally I think it is very important for achieving the authentic taste of the dish, however, the kung pao chicken will still be delicious with its absence. So don’t be discouraged in making this recipe if you simply can’t find Sichuan peppercorns, you will still enjoy it.
- 2 chili peppers will create a dish with medium spiciness. So if you would like something with a little more oomph I recommend that you use at least 4 chilies.
- If you liked this kung pao chicken recipe then check out some of our other stir fry dishes such as Orange Chicken, Bell Peppers & Beef, and Egg Fried Rice.
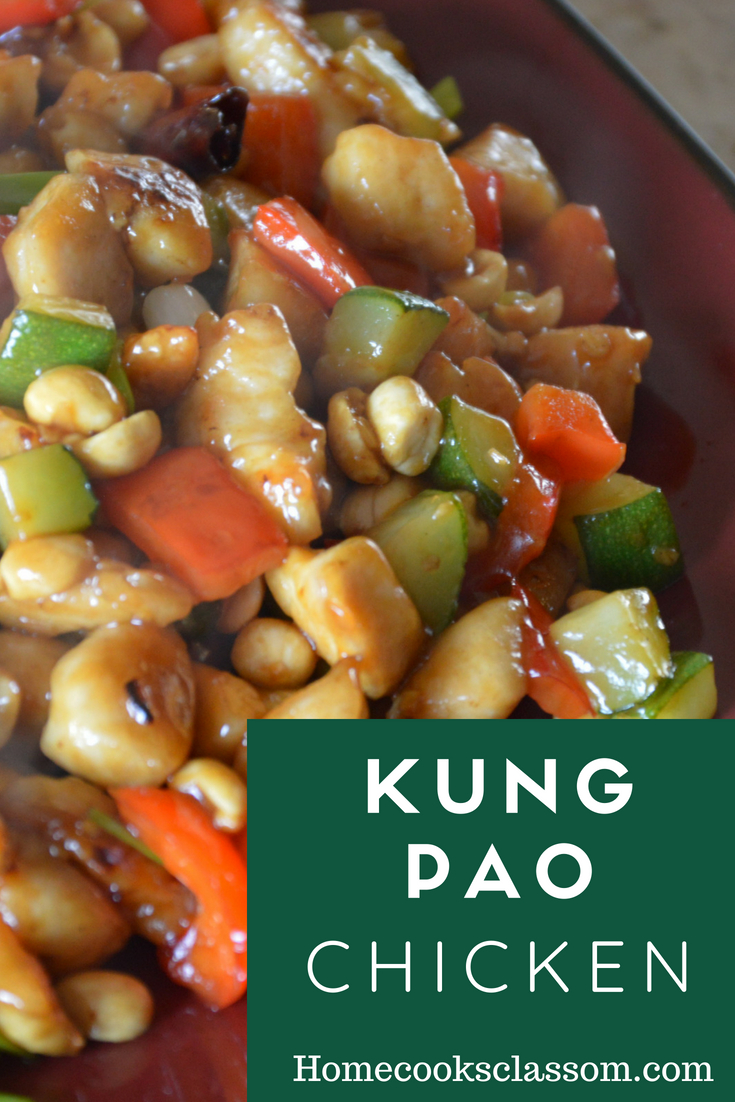
Kung Pao Chicken Recipe
Prep time: 20 minutes
Cook Time: 10 to 15 minutes
Servings: 4
Ingredients
1 to 1 ¼ Lbs of chicken breast (cut into roughly ¾ inch chunks)
1 Red bell pepper (cut into roughly ¾ inch chunks)
1 ½ Cup of zucchini (cut into roughly ¾ inch chunks)
6 Green onions (sliced into 1 inch long sticks)
3 Cloves of garlic (minced)
1 Tablespoon of fresh ginger (minced)
2 to 4 Dried chilies de arbol (broken up and deseeded)
10 Sichuan peppercorns (whole)
4 Tablespoons of neutral oil (such as vegetable or canola)
1 Tablespoon of cornstarch
1 Tablespoon of dry sherry
¼ Teaspoon of salt
¼ Teaspoon of ground white pepper
1 Cup of unsalted peanuts
For the kung pao sauce:
1½ Tablespoons of soy sauce
1 Tablespoon of seasoned rice wine vinegar
1 Teaspoon of sugar
1 Teaspoon of cornstarch
3 Tablespoons of water
Instructions
- Prep and marinate the chicken: Slice chicken into chunks that are roughly ¾ inch in size. Don’t worry if they aren’t perfect, just try to get them as similar in size as possible. Place these chunks of chicken into a bowl. Add to this bowl the tablespoon of oil, a tablespoon of cornstarch, ¼ teaspoon of salt, Tablespoon of sherry, and the ¼ teaspoon of white pepper. Mix all of this together and let sit for 20 to 30 minutes
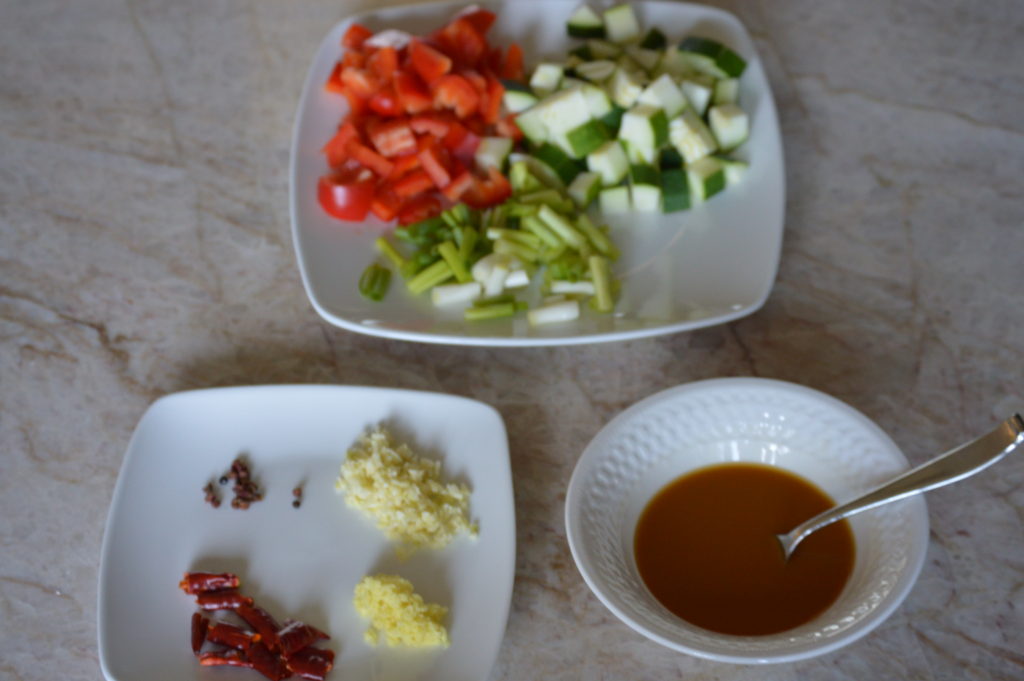
- Make the sauce and prep the other ingredients: Get out a small bowl and add all of the kung pao sauce ingredients to it. Mix this up with a fork in order to make the sauce. FYI ***You will most likely need to stir this sauce up real quick before adding it to the dish during step 6, as the corn starch can resettle on the bottom***. After you have made the sauce then it is time to cut and prep all of the veggies and aromatics.
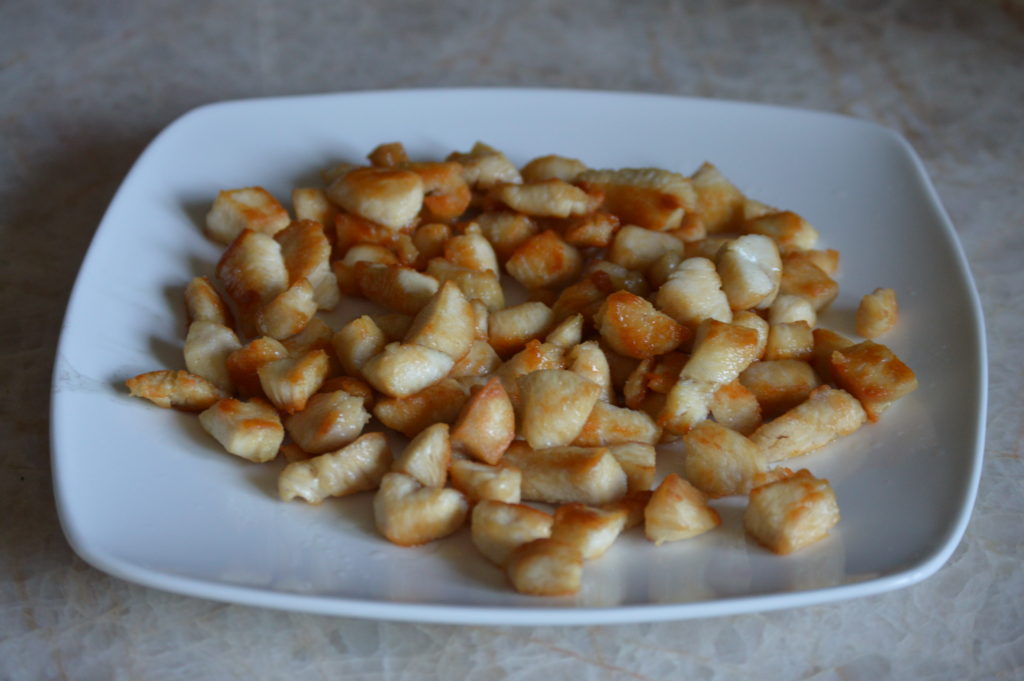
- Cook the chicken: Once the chicken has marinated for 20 to 30 minutes, add 2 tablespoons of oil to your wok, or large skillet and put it over high heat on your stove. It is imperative that when making a stir fry to ensure the wok is very hot. So wait until the oil starts to smoke. Once it has reached that point, add the chicken in two separate batches. Cook them for about 3 to 5 minutes each, or until they start to get a nice golden seared color. I know you might be asking yourself, why can’t I cook it all in one batch? Well if you attempt to cheat your way out of this the chicken will take forever to brown up. After the chicken has been properly cooked, take it out and set it aside on a plate.
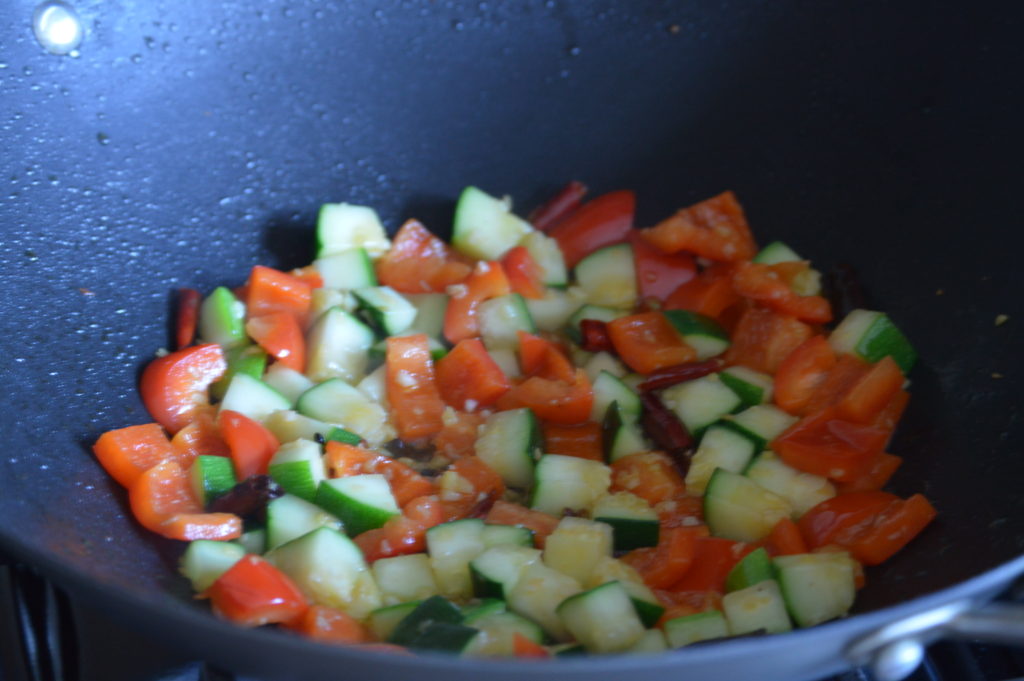
- Fry the aromatics: Add another tablespoon of oil to your wok and toss in the garlic, ginger, chilies, and Sichuan peppercorns. Give this all a quick stir. Don’t let it cook for too long, as you can end up burning some of these aromatics. Basically, give it about 30 seconds to a minute.
- Add the zucchini and bell pepper: Quickly toss in the zucchini and bell pepper, and make sure to stir them in with the aromatics. Let these two veggies cook for a minute or two until then begin to get a little color to them.
- Finish it off: Finally, add back the chicken along with the peanuts and stir fry everything for a minute or two. At the very end add in the sauce and the green onions. Stir it all together until the sauce thickens up and coats everything. This should only take about 30 seconds to a minute.
- Serve & enjoy this delicious kung pao chicken
Kung Pao Chicken Recipe
Ingredients
- 1 to 1 ¼ Lbs of chicken breast cut into roughly ¾ inch chunks
- 1 Red bell pepper cut into roughly ¾ inch chunks
- 1 ½ Cup of zucchini cut into roughly ¾ inch chunks
- 6 Green onions sliced into 1 inch long sticks
- 3 Cloves of garlic minced
- 1 Tablespoon of fresh ginger minced
- 2 to 4 Dried chilies de arbol broken up and deseeded*
- 10 Sichuan peppercorns whole
- 4 Tablespoons of neutral oil such as vegetable or canola
- 1 Tablespoon of cornstarch
- 1 Tablespoon of dry sherry
- ¼ Teaspoon of salt
- ¼ Teaspoon of ground white pepper
- 1 Cup of unsalted peanuts
For the kung pao sauce:
- 1 ½ Tablespoons of soy sauce
- 1 Tablespoon of seasoned rice wine vinegar
- 1 Teaspoon of sugar
- 1 Teaspoon of cornstarch
- 3 Tablespoons of water
Instructions
- Prep and marinate the chicken: Slice chicken into chunks that are roughly ¾ inch in size. Don’t worry if they aren’t perfect, just try to get them as similar in size as possible. Then get out a medium-sized bowl and place the chunks of chicken in it. Add to this bowl the tablespoon of oil, a tablespoon of cornstarch, ¼ teaspoon of salt, Tablespoon of sherry, and the ¼ teaspoon of white pepper. Mix all of this together and let sit for 20 to 30 minutes
- Make the sauce and prep the other ingredients: Get out a small bowl and add all of the kung pao sauce ingredients to it. Mix this up with a fork in order to make the sauce. FYI ***You will most likely need to stir this sauce up real quick before adding it to the dish during step 6, as the corn starch can resettle on the bottom***. After you have made the sauce then it is time to cut and prep all of the veggies and aromatics so that everything is ready to go when you start cooking.
- Cook the chicken: Once the chicken has marinated for 20 to 30 minutes, add 2 tablespoons of oil to your wok, or large skillet and put it over high heat on your stove. It is imperative that when making a stir fry to ensure the wok is very hot, so wait until the oil starts to smoke. Once it has reached that point, add the chicken in two separate batches, and cook them for about 3 to 5 minutes each, until they start to get a nice golden seared color. I know you might be asking yourself, why can’t I cook it all in one batch? Well, trust me that if you attempt to cheat your way out of this, that the chicken will take forever to brown up, by which time it will have become overcooked. After the chicken has been properly cooked, take it out and set it aside on a plate.
- Fry the aromatics: Add another tablespoon of oil to your wok and toss in the garlic, ginger, chilies, and Sichuan peppercorns. Give this all a quick stir, and don’t let it cook by themselves for too long, as you can end up burning some of these aromatics. Basically, give it about 30 seconds to a minute.
- Add the zucchini and bell pepper: Quickly toss in the zucchini and bell pepper, and make sure to stir them in with the aromatics. Let these two veggies cook for a minute or two until then begin to get a little color to them.
- Finish it off: Finally, add back the chicken along with the peanuts and stir fry everything for a minute or two. At the very end add in the sauce and the green onions, stirring it all together until the sauce thickens up and coats everything. This should only take about 30 seconds to a minute.
Notes
Inspiration from other blogs
From Woks of Life
From Rasa Malaysia