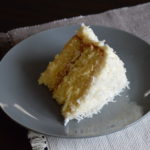
Layered Coconut Cake Recipe
Servings: 12 slices of cake
Ingredients
For the cake:
- 3 ½ Cups of cake flour
- 1 ½ Cups of granulated sugar
- 1 ¾ Cups of coconut milk
- ½ Cup of salted butter softened
- ½ Cup of vegetable oil
- 4 Eggs
- 4 Teaspoons of baking powder
- 2 Teaspoons of coconut extract
- ½ Teaspoon of salt
For the frosting:
- Double our cream cheese frosting recipe and substitute one teaspoon of the vanilla extract with coconut extract
- 1 to 2 Cups of shaved coconut
Instructions
- Preheat oven to 350 degrees Fahrenheit
- Grease and flour your baking pans: First get out a stick of butter, and rub it into the pans until they are greased. Then sprinkle a pinch or two of flour on the inside and tilt the pans until the flour spreads all over the greased areas.
- Mix up the wet ingredients: You can use either a stand mixer, or a large mixing bowl with a hand mixer. Begin by creaming the butter, oil, and sugar together until they are nice and smooth. Next add in the eggs, and coconut extract and beat them into the mixture for two minutes. Finally pour in the coconut milk and mix that in.
- Mix up the dry ingredients: Get out another mixing bowl and add the cake flour, baking powder, and salt to it. Use a whisk to make sure it is all mixed together.
- Combine the wet and dry ingredients to make the batter: Slowly add in the dry ingredients to the wet ingredients. Do this at about 1 cup at a time, mixing the dry ingredients in before moving on to the next cup. Once the batter has been made distribute them evenly into both of the greased pans.
- Bake for 30 to 35 minutes
- Let them cool for an hour: Let the cakes cool in the pans for about 10 minutes. Then shake them loose and place them on a wire rack to cool for the remaining 50 minutes.
- Make the frosting: While the cakes are almost done cooling off, make the cream cheese frosting per our instructions above.
- Assemble the cake: While it’s not necessary, we recommend that you lay out a few pieces of wax paper where the edges of the bottom cake will lay. The reason for this is that it will help keep the cake stand clean. Begin by placing the first layer of cake upside down on the wax paper. Next dollop and spread out a layer of the frosting on top of the cake. Then carefully place the second cake on top. Follow this up by spreading the rest of the frosting on the sides and top of the cake. At the end, sprinkle and mat some of the shaved coconut onto the top and sides of the cake. Let this cool in your fridge for an hour or two.
- Slice up the layered coconut cake and enjoy!
Notes
Our cream cheese frosting recipe is here https://homecooksclassroom.com/homemade-cream-cheese-frosting/